StatCounter:- A valuable and simple tool to analyze,share your traffic stats with others,and ultimately increase your traffic
Most of us use Google Analytics which is free to analyze our traffic and this is a good practice, but self analysis of your website should be augmented by sharing your traffic stats to the whole world.
This cannot be done through analytics as such, there are many other services which can do this but in my personal preference i use stat counter to achieve this for me. StatCounter is a paid service but there is also a fully functional free version which is out there to try and believe me the free version is also as powerful as the paid version for a normal user. StatCounter gives you a quick way to analyze your traffic data,although analytics gives much better presentation of the data but still for the simplicity sake i prefer stat counter. One more benefit for which i use stat counter is its summary area which you can share with other people. Although you can face one problem while using statcounter that how to enable showing stats to guest user to your blog or your website.  By default if you provide the link given by stat counter it will ask you the login credentials but if you just append &guest=1 after the link as shown in figure" then whenever the user clicks the link from his website he will be redirected to the summary page of your project in the stat counter. I personally use both stat counter and google analytics to keep track of traffic on my websites.
No web.config found inside the latest release of DotNetNuke
If you have downloaded the latest version of DotNetNuke to play with it,and you have done all setup things correct still if you run the website then an error is thrown which says
Could not find file "c:inetpubwwwrootDotNetNukeweb.config".
Exception Details: System.IO.FileNotFoundException: Could not find file "c:inetpubwwwrootDotNetNukeweb.config".

Source Error:

Line 44:             ' open the web.config file
Line 45:             Dim xmlDoc As New XmlDocument
Line 46:             xmlDoc.Load(Common.Globals.ApplicationMapPath & "web.config")
Line 47:             Return xmlDoc
Line 48:         End Function
This error is simply thrown as there is no web.config file inside the download if you have done whole source download.
This is because there are two other files called development.config and release.config
So the solution is just rename any of these files to web.config and you are done and ready to run your DotNetNuke installation.
Happy Programming!!!!!!!!!!!!!!!!!!!
Installing Collabnet Subversion + Tortoise SVN + AnkhSubversion for Source Code Sharing for Visual Studio related Development
Introduction Source Control is a must while developing big projects with big teams ideally you should use a source control if you are not working alone on the project. With Visual Studio there are a no of options available but today in this article i will discuss about Collabnet Subversion in combination with ANKH Subversion and Tortoise SVN. Although other options available are also good and have their own unique features but if you want a source control combination for free then this is the combination which is best suited to you. Among other options Source Gear Vault and Source Fortress which are also good source control tools. Other option available is VisualSVN which is a Visual Studio Plugin, which integrates within the Visual Studio the power of Subversion and Tortoise but its not free so the best combination available is Collabnet Subversion+Tortoise SVN + AnkhSubversion.
Packages to download and install
- Collabnet Subversion ----> http://www.collab.net/downloads/subversion/
- Tortoise SVN --------> Tortoise SVN is the best Subversion GUI available.-------->http://tortoisesvn.net/downloads
- Ankh SVN Plugin for Visual Studio ------> Ankh is an open source Subversion Plugin for Visual Studio --->http://ankhsvn.open.collab.net/servlets/ProjectProcess?pageID=3794
Steps to download and install Collabnet Subversion + Tortoise SVN + Ankh Subversion
- First download and install Collabnet Subversion. Download url ---> http://www.collab.net/downloads/subversion/
- It will ask for default repository just let it be on the default location ie c:svn_repository or if you change the repository then remember the path which you used for the new repository because we will require that repository in future while configuring new projects or else we can create a new repository to enter new projects.
- Collabnet Subversion will automatically ask you to install apache tomcat let it install the tomcat for you on its default port as 80 do not change the port initially as in some case if you initially give a different port it will not work after installations.
- But when you install it on default port 80 many of your IIS related applications or sharepoint sites may seize to work but don't worry we will change it later.
- Now after installing Collabnet Subversion just go to the installation directory and just search for the httpd folder and there you will find httpd.config file where just modify the listening port to 85 or any other port just keep in mind many firewalls generally block port above port 3000 so just check with your firewall if you are using a port number above 3000.
- Now just install the tortoise SVN client from ---------> http://tortoisesvn.net/downloads
- After installations also install ANKHSVN from ---------> http://ankhsvn.open.collab.net/servlets/ProjectProcess?pageID=3794
- We are using 2 clients because this tortoise SVN do not integrate itself with Visual Studio its only directory based where as this AnkhSVN gets itself attached with visual studio very well you can update and commit changes directly from Visual Studio.So the million dollar question is why not use only ANKH svn so the million dollar answer is that ankh svn is not having its own client GUI its only integrated from visual studio and its easy to do checkouts for the first time from tortoise and it helps in repository manipulations directly from the front end ui or else we have to do everything with the command line for the Collabnet svn server to create repository on the server .
Configuring and creating repositories the easiest way
- Now after you have installed Collabnet Subversion you need to create repositories so i am describing the simplest way to create repositories.
- Create a folder in your disk where you want to save all your projects for subversion say you called it svn.
- Now inside svn start creating folders like ProjA and ProjB for different projects.
- After creating the repositories you have to configure the config files in order to provide right authorization and authentication.
- I will describe here the simplest form i.e using authentication you can also implement groups and other stuff that you can change in the auth file.
- So to create repository the simplest and the easiest way is to use Tortoise SVN client you can also create it using command prompt but i prefer the Tortoise SVN way.
- Right click inside the ProjA folder you just created and you will have a TortoiseSVN shell menu item saying Create Repository here click on this and the repository files , config files and database files are created.
- After creating the repository just go to the conf folder and open you will find svnserve.conf file.
- Open this file in notepad and remove everything from this file except what is given below
[general]
# anon-access = read
auth-access = write
password-db = passwd
# authz-db = authz
realm = subversion
- Now save this file and open another file in the same folder named passwd, open this file also with notepad, in this file write your usernames and passwords for the users who are authenticated for this repository.
[users]
abc = abc
user = password
- Save this file and you are done.
- On the client open the server using Repo Browser from Tortoise SVN you will get repo browser option by right clicking anywhere in the explorer and exploring the Tortoise Shell options.
- In the repobrowser type snv://yourservername/yourrepositoryname/ and you will be able to acess the repository.
Tabbed Browsing in IE6 :- How to get tabs in Internet Explorer 6
Tabbed Browsing is a concept which is now common in every new browser whether it is IE7 or IE8 or Firefox old and latest versions,Chrome,Safari,Opera and generally every new browser have this facility to be called new enough and to get added to the list and make a difference. But many people still use old days Internet Explorer 6 and we as developers have to make our websites work as well under IE6 as they are in other new generation browsers. But without tabbed navigation it is very difficult for any type of user who uses IE6 either he is a developer or he is using IE6 for simple browsing purpose. So the workaround to get tabs for IE6 is really very simple Workaround
- Just follow the below given link and download the Windows Live Toolbar
- http://toolbar.live.com/moresysreq.aspx for Microsoft Windows Vista™ RC1, Windows XP SP2, Windows Server 2003, or Windows 2000 SP4
- If you have already yahoo or msn toolbar installed and you dont require them please do remove them because especially yahoo toolbar will have some issues with the windows live toolbar.
- Now install this windows live toolbar.
- Now if you see tabbed browsing option button then its well and good.
- Else if you have a window like this with toolbar installed and no add tabs button.

- 6.Then probably the tabbed browsing button would not have been installed or it would have been turned off.
- 7.So if its not installed you can download it from this link
http://gallery.live.com/liveItemDetail.aspx?li=6ad971ea-c0dc-4880-be38-80f0859eb291&bt=2&pl=3
- 8.Just run the downloaded .msi file,Now your toolbar should contain the tabbed browsing buttons like this

- 9.After doing this also if you are not getting the button then please make sure that tabbed browsing is turned on.To do this just click you windows live toolbar icon at the leftmost part of the toolbar and select toolbar option from the menu and just turn on the tabbed browsing from there.
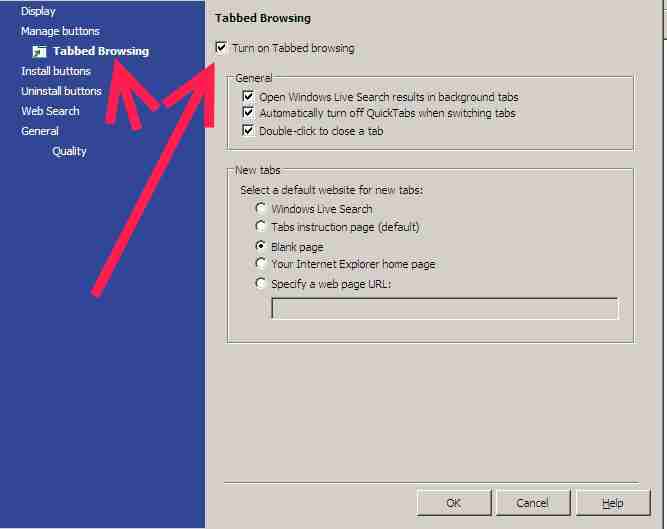
- This will do the trick for you!!!!!.
How to display firefox status bar in fullscreen mode
By default firefox will not show you the status bar when its running in the full screen mode. Status bar is needed in the full screen mode especially by developers to see what's being currently requested by the page which is currently being opened. Status bar also contains various plugins such as adsense plugin,video downloader plugins and many similar plugins. So given below are sequential steps on how you can get your status bar in full screen mode in firefox. Workaround
- Just navigate to the path given in your computer
- Windows XP/2000/2003Server----> C:Documents and Settings[User]Application DataMozillaFirefoxProfilesxgggxznr.defaultchrome
- Windows 95/98/ME----->c:windowsApplication DataphoenixProfiles[profile-name][#s].sltchrome
- Windows NT---->%UserProfile%Application DataphoenixProfiles[profile-name][#s].sltchrome
- *nix-------------->~/.phoenix/[profile-name]/[#s].slt/chrome/
- Mac OS X--------->~/Library/Application Support/Firefox/Profiles/[profile-name]/chrome/

- 2.By default on some operating systems you will not have userChrome.css file instead there will be a userChrome-example.css file.
- 3.Just open this userChrome-example.css file and find a section saying "@namespace url("......
mozilla.org/keymaster/gatekeeper/there.is.only.xul");
- /* set default namespace to XUL */"
- 4.Just below this section paste this one line of code ------------------>
#status-bar {visibility: visible !important;}
5.Just save a copy of this file and rename it as userChrome.css.6.Close and restart your firefox and switch to fulscreen mode now you can see your status bar in fullscreen mode as well.I have personally tested it on my Windows Server 2003 Machine.You people can test on Vista,98/ME, Linux,Mac and post your comment so that i can re so that i can update the correct path for the userChrome-example.css file in this article.
Google Calendar Sync for Windows Server 2003:-Install Google Calendar Sync on your Windows Server 2003 Systems
If you use Microsoft Outlook as a Desktop Client and want to synchronize your Google Calendar then you need to download and install Google Calendar Sync which can be downloaded here. http://dl.google.com/googlecalendarsync/GoogleCalendarSync_Installer.exe How to install this on Windows XP and Vista can be found here on this link http://www.google.com/support/calendar/bin/answer.py?answer=89955 But if you are running Windows Server 2003 then this installer will fail and give an error stating that this can only be installed on Windows XP and Windows Vista operating Systems. Workaround
- So the solution of this problem is just download a tool by microsoft called Application Verifier.
- Install this tool and just go to File ->Add Application.
- Now add the Google Calendar Sync.exe to this and just fool the installer to think that it is going to install on Windows XP system.
- How to do this is explained here in this article remember it shows the workaround for Photoshop CS3 but you have to open the Google calendar Sync file.
https://www.smallworkarounds.com/index.php/2008/09/17/installing-photoshop-cs3-on-windows/
Just copy the below as same given in the above article - Major Version --- 5 Minor Version---- 1 Build Number --- 2600 Service Pack Major -- 2 Service Pack Minor -- 1
Now just click save and run the Google Calendar Sync.exe Now it will just work fine. If you are getting an error saying that daylight timezone have not been updated either install that update from the link provided and if you are unable to download from there download it from the below link for Windows Server 2003 http://www.microsoft.com/downloads/details.aspx?FamilyId=40D82C50-2E93-45A1-AD4C-7F27AA0A0E25&displaylang=en I have not tested it for Windows Server 2008.Anyone who tested this trick please do leave a comment telling that is it working or not in WS2008.
Outlook 2007 Signatures:- Using custon HTML and styles in Signatures in Outlook 2007
Outlook 2007 does not give the facility to put the custom HTML and styling in Signatures under the signatures box.
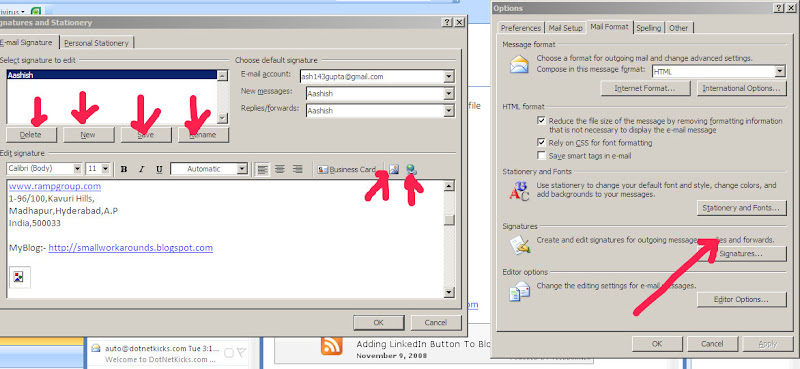
As you can see that by default when you edit your signatures you only have Delete New Save Rename Options. And also a few options to insert image and some hyperlink but no support for any kind of custom editing of HTML and styles. So what to do if you want to enter some custom HTML and do some styling to your signatures while using Outlook 2007. Here is the workaround. WorkAround

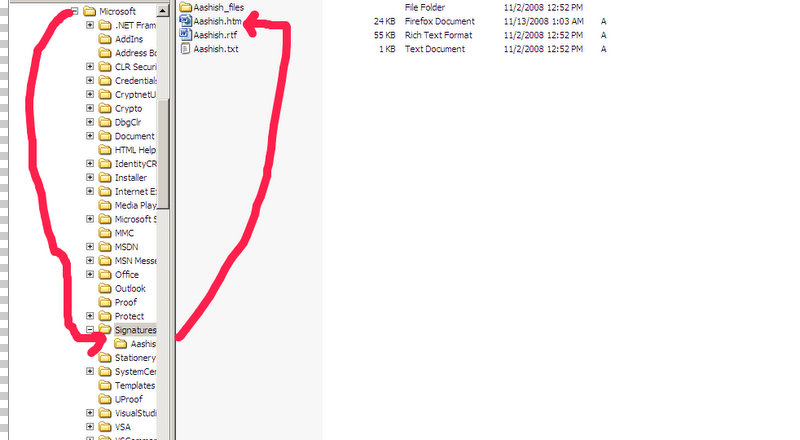
Just Navigate to your "C:Documents and Settings(your_username)Application DataMicrosoftSignatures". Here Search for the htm file which will generally be starting with you Name. Open this file in Notepad , Notepad++ and add whatever custom content you want to add.
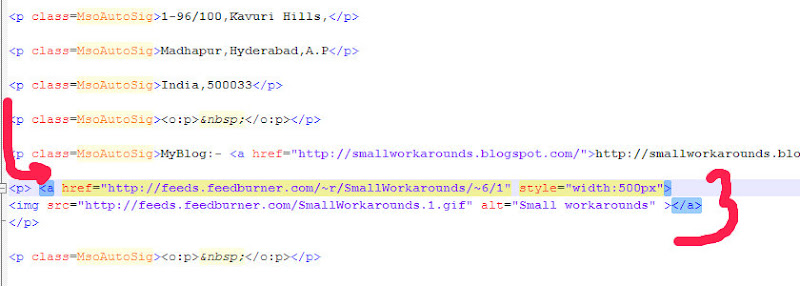
Click Save and you are done. Open your Outlook Signatures Box to see that changes made by you are reflected or not. Send a mail to your another account to check whether your custom signatures are working or not.
How to install Sql Server 2005 SP1 on existing SQL Server 2005 SP2 Install:- If you are getting "A recently applied update, KB913090, failed to install".
 If you are getting this error then one probable reason can be that you are trying to install Sql Server 2005 SP1 on a machine already having Sql Server 2005 SP2 Installed on it. This error might be followed by another error telling "SqlSupport.msp is not digitally signed" The best way to fix this error is by following these steps:-
- Save the data in the following Registry key HKEY_LOCAL_MACHINESOFTWAREMicrosoftMicrosoft SQL Server90BootstrapMSIRefCountUninstall
 2.Copy this value data in a text file and save it for future use. 3.Go to control panel , add/remove program and remove the Microsoft Sql Server Setup Support Files.While uninstalling you might get some error message or warning that this uninstall may effect some other Sql Server Components which are already installed. 4.Click Yes to uninstall on the error message. 5.From the installation CD browse to the folder ToolsSetup and start the SqlSupport.msi to again install the Sql Server Setup Support Files 6.After this step again browse to the registry location mentioned earlier and change the data value to the one we saved in the text file. 7.Now you can successfully start the install of Sql Server 2005 SP1
Installing Intel X3100 Graphics Driver on Toshiba Sattellite M200 Laptops having WS2003 as Operating Sytem
Those of you who are having trouble in installing X3100 Graphics Driver on Toshiba Satellite M200 and similar laptops in that series, the problem is that the driver that toshiba people have on their site is old version and it works only on Windows XPSP2 and later OS,it does not work on Windows Server 2003 OS. So the solution is just download the Graphics Driver for Windows XP for Dell Inspiron 1525. These dell people have latest driver and it install very smoothly on Windows Server 2003. If this also is not working for you than you can add setup.exe in the application verifier and do the proceeding as given in this post. https://www.smallworkarounds.com/index.php/2008/09/17/installing-photoshop-cs3-on-windows/
Installing Photoshop CS3 on Windows Server 2003 Systems
Hi yesterday i was trying to install Photoshop CS3 on a system having Windows Server 2003 installed. But it gives me an error saying that you need a OS equivalent to Windows XP SP2 or greater or Windows Vista. So i found a workaroud which i would like to share with you. Just download a utility from Microsoft called Application Verifier its a small but very benificial utility.Link is http://www.microsoft.com/downloads/details.aspx?FamilyID=C4A25AB9-649D-4A1B-B4A7-C9D8B095DF18&displaylang=en 1.Run the Application Verifier and open the setup.exe file for photoshop cs3 and go to the compatibility tree view column. 2.Go to HighVersionLie and right click it to get properties. 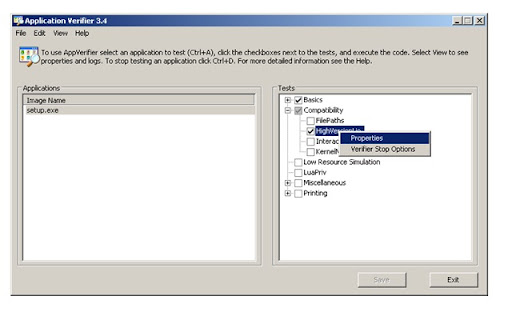 3.Now suppose if you want to any program assume that you are using Windows XP SP2 then enter like below figure in the boxes that follow
 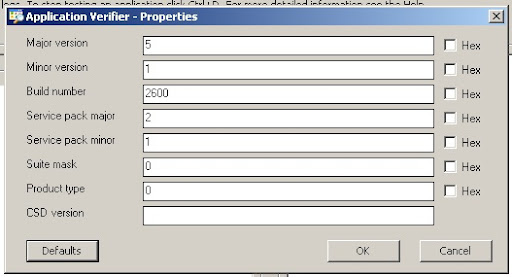 4.Click OK And then Save 5.It will then ask you for the debugger to be attached do not attach any debugger and click save . 6.Now if you try installing it will be installed with no problems.