Integrating Paypal with Blogger or any other Blog Provider
If you want to earn from your blog you have many options such as Adsense,Adbrite,LakeQuincy Media and there are several other advertising giants which will help you make more money. But another good way to make money from your blog is by providing a way through which users who want to donate you some bucks can directly donate it to you and the best possible solution which comes to my mind is PayPal. Here in this article i will show you how easy it is to integrate the paypal into your blog.I have done it on blogger,you can follow similar steps and embed it in any blogging platform
- Login to your paypal account.And click on the Merchant Services tab.

- After clicking the Merchant Services tab search for the word Donations and click it then you will see the below screen.
- Fill the form and selecting your choice and preferred buttons and then click Create Button

- After clicking on create button you will be provided with a code.Now you have to just place that code into your blog’s code to make it running.

- I will show you how to integrate it into blogger
- Login to your blogger account and go to Layout tab.Click on add a gadget

- After adding a popup window will be opened.Just enter the heading which you want to be displayed and also write few lines of your own choice which you want to display.After writing all this just paste the code which you got above i.e after creation of your button.

- Click Save and that’s it your paypal donation button is now integrated with your blogger blog.
Publishing Database to GoDaddy server using Database Publishing Wizard
GoDaddy shared hosting supports database publishing wizard which is a good news as earlier there were creepy means to publish the database to the godaddy servers.Now you can publish your database either in full or only the required objects to the godaddy server.
Follow the steps given in the below link to publish your database directly to the godaddy server http://products.secureserver.net/products/hosting/PublishingWithDPW.htm If you dont have Database Publishing Wizard already installed then you can download and install it from http://www.microsoft.com/downloads/details.aspx?FamilyId=56E5B1C5-BF17-42E0-A410-371A838E570A&displaylang=en After installation you will find the database publishing wizard in C:Program FilesMicrosoft SQL Server90ToolsPublishing1.2SqlPubWiz.exe But remember to backup your existing database prior to uploading or deleting the already existing database.
StatCounter:- A valuable and simple tool to analyze,share your traffic stats with others,and ultimately increase your traffic
Most of us use Google Analytics which is free to analyze our traffic and this is a good practice, but self analysis of your website should be augmented by sharing your traffic stats to the whole world.
This cannot be done through analytics as such, there are many other services which can do this but in my personal preference i use stat counter to achieve this for me. StatCounter is a paid service but there is also a fully functional free version which is out there to try and believe me the free version is also as powerful as the paid version for a normal user. StatCounter gives you a quick way to analyze your traffic data,although analytics gives much better presentation of the data but still for the simplicity sake i prefer stat counter. One more benefit for which i use stat counter is its summary area which you can share with other people. Although you can face one problem while using statcounter that how to enable showing stats to guest user to your blog or your website.  By default if you provide the link given by stat counter it will ask you the login credentials but if you just append &guest=1 after the link as shown in figure" then whenever the user clicks the link from his website he will be redirected to the summary page of your project in the stat counter. I personally use both stat counter and google analytics to keep track of traffic on my websites.

Visual Studio Team Foundation Server :- Tips & Tricks #1-Use of Annotate Feature in TFS
Annotate is a very important feature of Visual Studio Team Foundation Server which most of us ignore while developing our applications and working with the Team Foundation Server.Annotate Feature allows us to see changes which occurred in a particular file with respect to a particular change set.It will show you all the change sets and you can click on any change set to view what exactly it did.This is a very useful feature when you are working in a team and you are working on a particular file and unable to understand what changes your teammates have actually caused in that file.
Annotate feature was not available out of the box in VS2005.It came only when you install the Team Foundation Server Power Tools. After installing TFS Power Tools you have to type the following command to invoke the Annotate Viewer tfpt annotate <path_to_file> But in Visual Studio 2008 Team System with Team Explorer this functionality is built in,if you are working on any team project and want to use this functionality just right click any file and from the menu just choose "Annotate".

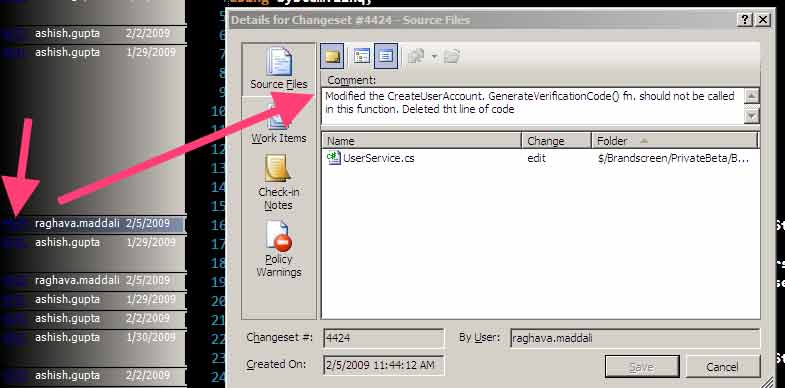
After clicking this option the file will be opened in the IDE with the change set numbers stated first followed by whom the change set was triggered and the date on which the change set was triggered.

If you click on any particular change set then this will open the full information about that change set in the above example i clicked on the change set 4424 so it opened the change set information window 4424 for me.
This approach can be very useful if you just want to look at the changes made to that file within the IDE, this comes very handy when you are working on that file and want to see who has modified it and for what reasons and what changes your team members have made.
Visual Studio Tips & Tricks #4:- Adding a new website mapped to IIS
How to create a new website which resides inside your solution folder as a web project but is automatically mapped to the IIS.Benefit of this approach is that we will be using IIS as the web server to run and debug this website not the Cassinni web server which is the default in Visual Studio.Another benefit is that we will escape the problems caused by the port no's which Cassinni bring by default.Some of us who prefer to use Cassinni can go on with it no probs!!!.But personally i like that each of my website in my project is mapped to a virtual directory in IIS.
Another benefit of creating IIS mapped website's is that when you share you code and other people open the solution then it automatically creates a website on the localhost no need to again map it to open with IIS.So given here is a step wise process along with pictures to illustrate how it is done.
I personally prefer to add a blank solution and then add new website's and projects to it,you can go other way round by choosing to create a new website with the option in Project And Solution in the Options menu in VS2008 to always create a solution for a project or website.By default Visual Studio will not create a solution if you only add a website. More information on how to create empty solutions and solution for only one web project refer to my article https://www.smallworkarounds.com/index.php/2009/02/20/visual-studio-tips-tricks-3-how-to-open/ Now right click on your empty solution or solution to which you want to add the new mapped website.It will ask you few options and there will be a drop downlist also from where you can select where you want to create new website. 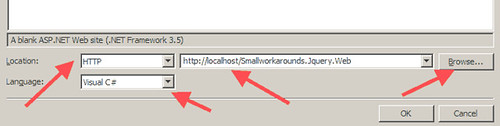 So here by default you will have filesystem, so go and change it to "http" from the dropdownlist and then click browse.This will take you to another selection box where in the top right you will see 3 buttons:- 1.Create New Web Application 2.Create New Virtual Directory 3.Delete So here from these 3 options just select the "Create New Virtual Directory" option
 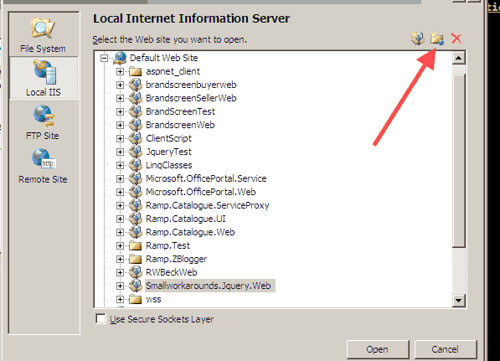 Now it will ask your for Alias Name and the Folder,just go and give any name what you want your virtual directory to be named as and the map it to the folder where you have initially kept your solution.
 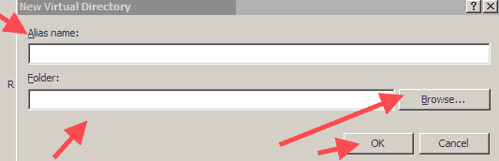 Press OK that's it now everytime when you click open your solution, it will check for the virtual directory if its there then well and good if its not there it will automatically create one for you. Happy Programming!!!!
Visual Studio Tips & Tricks #3:- How to open an empty solution
Sometimes we need to create an empty solution and add new projects to that solution.This approach comes handy when you first just want your empty solution within a folder structure and then you later want to just add new projects to this solution.
1.One possible solution is to Enable "Always Show Solution" in the Projects And Solution Tree inside the Options in Visual Studio.If you enable this then whenever you create a new project a solution will also be created for you with that project.This sometimes is a problem when we create only a single website and want a .sln or "solution file" to load that project. 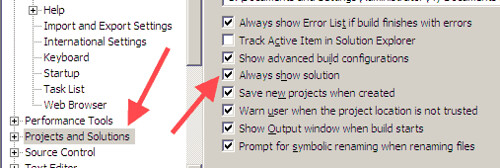 2. Another approach is just navigate to Other Project Types and in that go the subtree "Visual Studio Solutions" and here you will find "Blank Solution" template, this will open for you a blank solution into which you can add projects.
 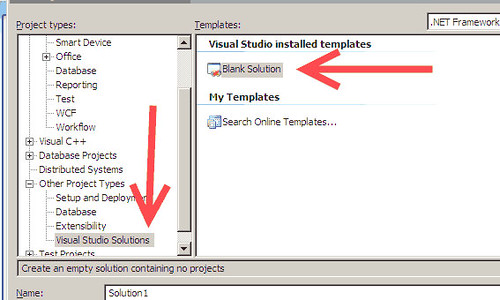 Initially there will be no projects loaded as we have not created any project.Just right click the solution and go to Add and then add new project,add new website, add existing project,add existing website what ever you feel like.
  Happy Programming!!!!
Asp.net & IIS Tricks:- Using GZip Compression with IIS 6.0 to compress your dynamic content such as your aspx pages and increase the client side experience by downloading the pages fast.
Introduction
In this article i will discuss how to enable gzip compression for the dynamic content.After following these steps you can enable compression for your aspx pages and other dynamic content. But you have to be careful while compressing the dynamic content.I would suggest you to use the dynamic compression only when although you are using asp.net but most of your webpages are more likely to be static with only few of them changing now and then. This is due to the reason that compression brings in overhead on the server CPU and memory.So if the content is so much dynamic that it keeps on changing with every request its not at all advisable to use the compression for your dynamic pages. Instead you can use gzip compression for your static pages such as html,css and js files. But if your dynamic content is also near about static then you can use gzip compression provided as a built in feature of windows and IIS 6,by default it is not enabled here in this article we will go through the steps to enable the gzip compression scheme. Enabling this compression can also be useful for developers who are running and testing their websites projects on their dev machines and are frustrated of long loading time of the content of their test websites and web applications.
Case Study
Here the case study consists of one of my recent projects which was a public facing website build up on Telerik's Sitefinity Content Management System. So here in my case as the client was using Sitefinity so my pages were all .aspx pages but they were rather static as we CMS enabled their existing HTML content which was almost static. So i will provide you with the reduction in size without any significant load on the server which was achieved using the gzip compression scheme with IIS Lets analyze the page HTML,CSS,JS before enabling the compression.Below are the images which are self explanatory.

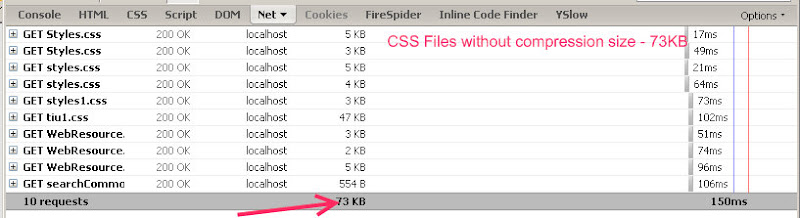
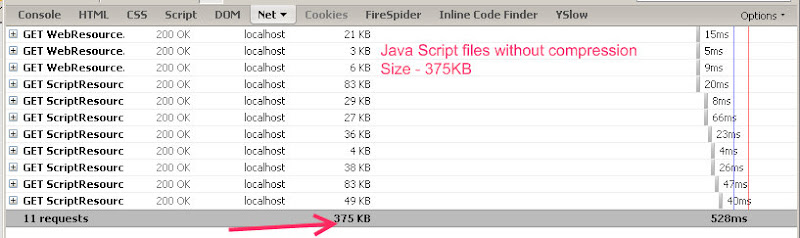

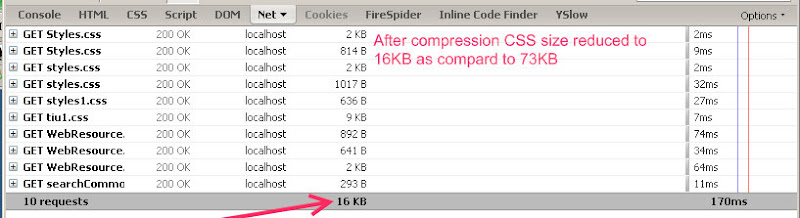
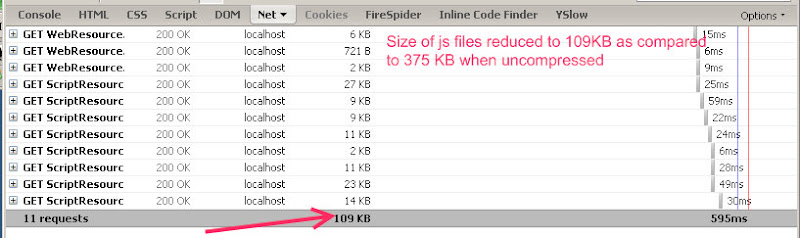
So it is now quite obvious that there is a lot of reduction in the actual page size which will be transferred across the wires. So in specific situations you should enable compression for all the content and in most of the cases at least you should enable the gzip compression for the static content. Enabling the GZip Compression Now let us walkthrough the steps to enable gzip compression within the IIS.
- To enable gzip compression first open the IIS Manager using "inetmgr" command at your run command prompt.
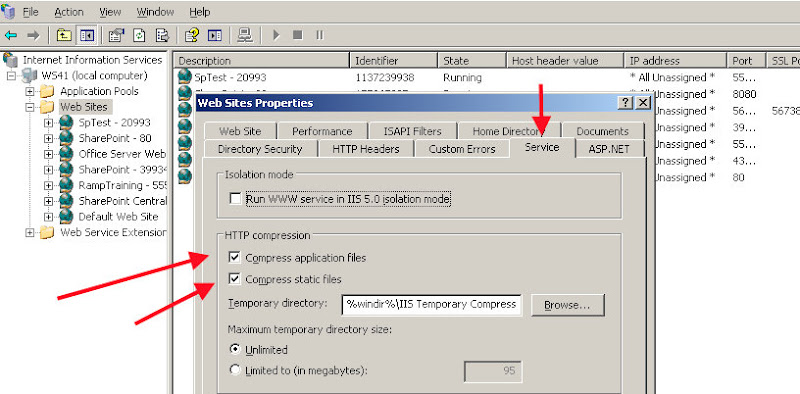
- After opening the IIS Manager navigate to the website properties by right clicking the website node.(Remeber here all images are shown from Windows Server 2003)
- Now go to the service tab and inside the http compression section enable compress application files and compress static files both and then click ok.
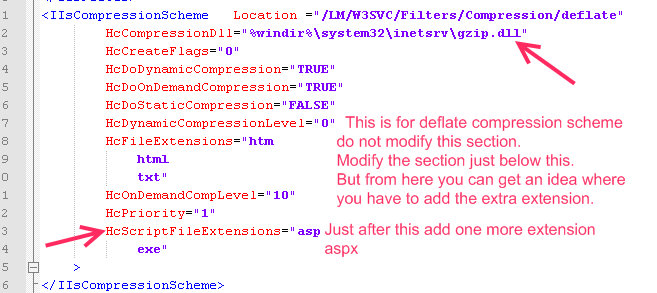
 After this just navigate to the Web Service Extension section and in this section add a new extension for gzip compression.Just Click Add new Web Service Extension and name the extension as Http Compressor or anything and in the Add section select the file gzip.dll which is inside C:WindowsSystem32Inetsrvgzip.dll and then click OK.


Conclusion User gzip compression over the default deflate compression every time for your all static pages and content leaving some special cases and scenarios. And also try for compression of your dynamic content if it is more of a static type. Getting file reduction upto 70-95% is a lot when we are talking about transferring data on net. Happy Programming!!!!.... Stay tuned for more on upcoming posts..........
Visual Studio Tips & Tricks #2:-Decrease your loading delay by stopping the splash screen to load on Visual Studio Startup
Sometimes you may find that your Visual Studio IDE is taking a lot of time to startup and this is annoying. So there can be many reasons why your IDE is behaving so strange and slow. So one of the visual enhancement trick is to disable the splash screen which comes when visual studio starts up. To disable this splash screen just go to your Desktop icon which says "Microsoft Visual Studio 2005/2008" and right click on it. No click on the Properties and in the target to this shortcut just add /nosplash. Now your target looks as "C:Program FilesMicrosoft Visual Studio 9.0Common7IDEdevenv.exe" /nosplash. And now if you open your IDE with this shortcut then you will not find any splash screen while loading. Remember this removes the splash screen option only from your shortcut, so if you use devenv Run shortcut then you will see the normal splash screen. Stay tuned for more tips and tricks... Happy Programming!!!!!
Visual Studio 2008 Tips & Tricks for Developers:- This includes some shortcuts and some hidden features in Visual Studio 2008 which will increase your productivity
- Working in Full Screen Mode in Visual Studio
- Alt+Shift+Enter is the shortcut to enter to fullscreen mode in Visual Studio
- Its sometimes really helpful and more appealing for developers to work in full screen mode
- Editing
- For Copying a line in the IDE just go to the start of the line and press Ctrl+C,there is no need to select anything
- For Pasting a line just go to the start of the line and just press Ctrl+V
- For Deleting a line just go to the start of the line and press Ctrl+X, this is not actually delete but its similar to cut if you do Ctrl+X on current line and go to some other place in your code and do Ctrl+V then it will paste the same line there.
-

- Expanding and Collapsing the code units
- This nice little shortcuts has saved me a lot of time.Whenever i am working on a large piece of code i always get confused and make some changes in other Method or property because they were looking similar.
- But now with this shortcut i collapse one method as soon as it is finished.
- The shortcut is Ctrl+M+M.
- Just go to the beginning or end of the method or property or any code block and hit the shortcut it will expand or collapse the code block comparing to its present state.
- If you want to collapse all your code units or blocks to their definitions then the shortcut to achieve this is Ctrk+M+O or Ctrl+M Ctrl+O.This is also a very handy shortcut which helps a lot in development.
- Automatic Text Indentation and Formatting
- This shortcut helps me to write beautiful and decorative code which is easy to understand by any person.
- Shortcut is just press Ctrl+K+D.
- This works not only in C# and VB code behind but it works well in aspx pages.
- If you want to just format the selected piece of code then just press Ctrl+K+F
- Automatically adding Namespaces
- Use the Ctrl+. (Remember this is Ctrl+[period] if you get confused) shortcut key to automatically get intellisense for probable namespaces.
- Just press enter to include the required namespace.
- There are much cooler tricks when using a refactor like Resharper.I will discuss those tricks later this month in one of my posts.
- Commenting And Uncommenting The Code
- This trick saved me a lot of time.
- Just select the code to be commented and press Ctrl+K+C,this will comment your code block.
- For uncommenting the code just press Ctrl+K+U,this will uncomment the code block.
- Automatically generating properties
- Generating dummy getter and setters or properties is also a pain in big projects.
- Although i would recommend you some refactors like Resharper which can do it for you or some code generators like Code Smith and also give a try to inbuilt on in Visual Studio 2008 called T4 or Text Template Transformation Toolkit.
- But if you don't have such a mass volume project and just don't want to write your getter and setters then just type this prop + TAB+TAB
- Remember you don't have to type all of this but you only type prop and then press TAB two times for VS2008 to automatically generate the property for you now you can change the name and any other thing by navigating and just pressing TABS.
- Increasing and decreasing the indentation
- Select the code block for which you want to increase the indentation and after selecting just press TAB,this will increase the indentation.
- To decrease the indentation just select the required code block and then press SHIFT + TAB,this will decrease the indentation of the selected code block.
- Selecting a single word then line and then other lines within that block and then.......
- This is also a cool trick if you are in middle of something and want to do something on either the word you are on or the entire code block, or entire method, or entire class then just go on pressing Ctrl+W,it will start selecting for you starting from the current word.
- After selecting the desired code block you can perform any operation on that code block.
- Build & Debug Shortcuts and tricks
- To build a solution just press Ctrl+Shift+B
- To start debugging just press F5
- To stop debugging just press Shift+F5
- If you are already debugging or your WebDev.WebServer.Exe is running or any other webserver is running you can directly attach to that process escaping the hussle to build again this is a great time saver.Remember always build or rebuild if you have done some major changes but if simply you want to debug and have done no changes in any other class library projects then you can use this trick
- Simply Press Alt+D+P then the Attach to process window will open.
- Simply choose your web server process to attach and you will see without building your entire solution your solution has been attached to the debugger.

- Find Options
- You are already familiar with Ctrl+F option to find something either in current documents or all open documents or entire project or entire solution,but another find option is Ctrl+Shift+F, this trick is helpful when you want all your results to be listed in a find window rather then to navigate one by one in every file where the searched string exists.
- Switching Between Design And Source Views
- F7 is the key used to switch between design and source (ie c# or vb files) views in IDE
- If you want to just toggle the markup's design and source view or want to view both then press Ctrl+PageDown
- Some other common used shortcut keys which can be helpful
- Ctrl+Alt+L for opening Solution Explorer
- F4 for opening properties window
- Ctrl+Alt+X for showing the toolbox
- Ctrl++T for displaying the tasklist
- Ctrl++E for displaying the error list
- How to navigate between various opened tabs inside Visual Studio
- Ctrl+TAB key will let you navigate between various open tabs in Visual Studio IDE
- Going to Declaration and then again returning to the actual usage
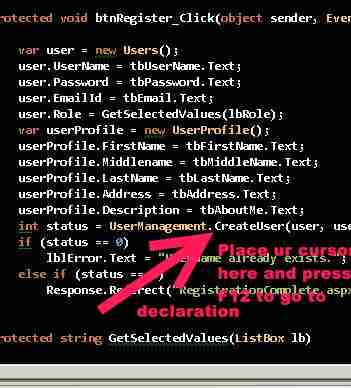
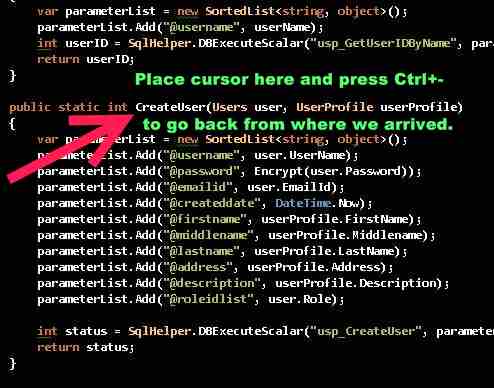
- Just press F12 to go to declaration
- And press Ctrl+- to return back to the piece of code where you were earlier.
- Selecting Source Control Plugin
- If you are working in a team you probably will be using a source control there are many options to choose SVN,Visual SVN,TeamFoundationServer,Source Vault and Source Fortress and many others.
- But when selecting a client you have to mention it in Source Cotrol Plugin Selection as shown below

- I want solution for every project which i create
- If you want a solution for every project which you create then you have to enable this as shown below

I would have really forgotten many things which could be added in this list.I will update this list regularly as I encounter any new thing,so stay tuned for more Also I would be doing an extensive post on Resharper 4.0,the most sharpest refactoring tool available out there its not just a refactor but a way beyond that Believe me i use it in my day to day coding and it makes development process 100K faster. Happy Programming!!!! Update 12Dec2008
- For deleting a line in Visual Studio just place the cursor in front of it and press Ctrl+Shift+L
Update 4 Jan 2009
1.This post links to a tip used to decrease the load time of the IDE by disabling the splash screen. https://www.smallworkarounds.com/index.php/2009/01/04/visual-studio-tips-tricks-2-decrease/ “If someone wants to purchase Visual Studio 2008 at a discounted price, you can purchase at a low price from eCostSoftware.”