Application Architecture guide 2.0 released
Application Architecture Guide 2.0 project guide provides design-level guidance for the architecture and design of applications built on the .NET Framework. It focuses on the most common types of applications, partitioning application functionality into layers, components, and services, and walks through their key design characteristics.This guide is a collaborative effort between patterns & practices, product teams, and industry experts. This guide is related to the project http://www.codeplex.com/AppArchGuide/Release/ProjectReleases.aspx?ReleaseId=20586 This guide is a free download from Codeplex http://www.codeplex.com/AppArchGuide/Release/ProjectReleases.aspx?ReleaseId=20586 It gives a in depth knowledge of best practices and patterns to be followed while doing .net related development Few topics which it covers are mentioned below
- Architecture & Design Guidelines
- Deployment Patterns
- Architectural Styles
- Quality Attributes
- Layers & Tiers
- Presentational Layer Guidelines
- Business Layer Guidelines
- DAL Guidelines
- Service Layer Guidelines
- Application Architecture types
- Web Applications
- RIA's
- Services
- Mobile Applications
- Office Business Applications
- Sharepoint LOB Applications
This is a must read guide to all Technical Architects and also to any .net developer
Installing Collabnet Subversion + Tortoise SVN + AnkhSubversion for Source Code Sharing for Visual Studio related Development
Introduction Source Control is a must while developing big projects with big teams ideally you should use a source control if you are not working alone on the project. With Visual Studio there are a no of options available but today in this article i will discuss about Collabnet Subversion in combination with ANKH Subversion and Tortoise SVN. Although other options available are also good and have their own unique features but if you want a source control combination for free then this is the combination which is best suited to you. Among other options Source Gear Vault and Source Fortress which are also good source control tools. Other option available is VisualSVN which is a Visual Studio Plugin, which integrates within the Visual Studio the power of Subversion and Tortoise but its not free so the best combination available is Collabnet Subversion+Tortoise SVN + AnkhSubversion.
Packages to download and install
- Collabnet Subversion ----> http://www.collab.net/downloads/subversion/
- Tortoise SVN --------> Tortoise SVN is the best Subversion GUI available.-------->http://tortoisesvn.net/downloads
- Ankh SVN Plugin for Visual Studio ------> Ankh is an open source Subversion Plugin for Visual Studio --->http://ankhsvn.open.collab.net/servlets/ProjectProcess?pageID=3794
Steps to download and install Collabnet Subversion + Tortoise SVN + Ankh Subversion
- First download and install Collabnet Subversion. Download url ---> http://www.collab.net/downloads/subversion/
- It will ask for default repository just let it be on the default location ie c:svn_repository or if you change the repository then remember the path which you used for the new repository because we will require that repository in future while configuring new projects or else we can create a new repository to enter new projects.
- Collabnet Subversion will automatically ask you to install apache tomcat let it install the tomcat for you on its default port as 80 do not change the port initially as in some case if you initially give a different port it will not work after installations.
- But when you install it on default port 80 many of your IIS related applications or sharepoint sites may seize to work but don't worry we will change it later.
- Now after installing Collabnet Subversion just go to the installation directory and just search for the httpd folder and there you will find httpd.config file where just modify the listening port to 85 or any other port just keep in mind many firewalls generally block port above port 3000 so just check with your firewall if you are using a port number above 3000.
- Now just install the tortoise SVN client from ---------> http://tortoisesvn.net/downloads
- After installations also install ANKHSVN from ---------> http://ankhsvn.open.collab.net/servlets/ProjectProcess?pageID=3794
- We are using 2 clients because this tortoise SVN do not integrate itself with Visual Studio its only directory based where as this AnkhSVN gets itself attached with visual studio very well you can update and commit changes directly from Visual Studio.So the million dollar question is why not use only ANKH svn so the million dollar answer is that ankh svn is not having its own client GUI its only integrated from visual studio and its easy to do checkouts for the first time from tortoise and it helps in repository manipulations directly from the front end ui or else we have to do everything with the command line for the Collabnet svn server to create repository on the server .
Configuring and creating repositories the easiest way
- Now after you have installed Collabnet Subversion you need to create repositories so i am describing the simplest way to create repositories.
- Create a folder in your disk where you want to save all your projects for subversion say you called it svn.
- Now inside svn start creating folders like ProjA and ProjB for different projects.
- After creating the repositories you have to configure the config files in order to provide right authorization and authentication.
- I will describe here the simplest form i.e using authentication you can also implement groups and other stuff that you can change in the auth file.
- So to create repository the simplest and the easiest way is to use Tortoise SVN client you can also create it using command prompt but i prefer the Tortoise SVN way.
- Right click inside the ProjA folder you just created and you will have a TortoiseSVN shell menu item saying Create Repository here click on this and the repository files , config files and database files are created.
- After creating the repository just go to the conf folder and open you will find svnserve.conf file.
- Open this file in notepad and remove everything from this file except what is given below
[general]
# anon-access = read
auth-access = write
password-db = passwd
# authz-db = authz
realm = subversion
- Now save this file and open another file in the same folder named passwd, open this file also with notepad, in this file write your usernames and passwords for the users who are authenticated for this repository.
[users]
abc = abc
user = password
- Save this file and you are done.
- On the client open the server using Repo Browser from Tortoise SVN you will get repo browser option by right clicking anywhere in the explorer and exploring the Tortoise Shell options.
- In the repobrowser type snv://yourservername/yourrepositoryname/ and you will be able to acess the repository.
Jquery Series Part 1:- Basics & Introduction
- Jquery is a JavaScript library which makes life with JavaScript and DOM easier and common tasks really simple and trivial
- $("table tr:nth-child("even").addClass("striped");
- Selectors are the most powerful feature of Jquery.The raw power of Jquery is in selecting and grabbing an element and then playing with that elements style or its surrounding elements.
- The concept of Unobtrusive Java Script tells us that any JavaScript code placed inside the <body> tag is incorrect so this means that we have to separate our behavior from our markup or ui
- Without using the concept of unobtrusive JavaScript we can say these lines of code to be correct
- <input type="button" onclick="document.getElementById('testDiv').style.color = 'red';" />
- Now if we want to use the concept of unobtrusive java script here and want to separate the behavior and markup then we can simply use
<input type="button" id="testButton" />
Now we can have this script in the header section thereby separating the behaviour from the markup
window.onload = function (){
document.getElementById('testButton').onClick = changeColor;
};
function changeColor()
{
}
- But ultimately what has happened is that we have increased no of lines of code in lust to separate but as far as good programming practices are considered on the client side then this approach is the best although it increases no of lines of code.
- So what jQuery does is simplify this simple unobtrusive JavaScript concept using few lines of code.
- It also has various other magic features which we will discuss in other articles of this series such as chaining
- Jquery handles most of the browser issues by itself which is a major advantage of using jQuery over raw JavaScript
- Jquery waits until the page is loaded so that we have all the controls created before any call or action to them this is another added advantage.
- Jquery is fully extensible that's what millions of developers are doing out there using jquery.
- Jquery is so extensible, one reason for embedding so much extensibility is its light weight it's just 15-17 KB of download depending on your version on the client system with minimal still powerful set of functionality.If you are not satisfied and want more then you are open to extend it or use already available rich set of plugins and other third party tools available for jquery.
- $() is the wrapper used to wrap jQuery() what $ does is it selects the set of elements and return a JavaScript object containing array of all DOM elements that match the selector
- Another important power of Jquery that it returns the set of all objects which were initially selected upon performing one operation on those set of elements ie if i select all the p elements of div's with class = "dance" and perform a single line function $('dance').fadeOut(); it will first fadeout all the divs and p's with the required class dance and after fading out it will again return all these objects for further performing some actions on these set of objects.
- So actually we can chain these elements a thousand layer deep all in a single line of code as shown
- $('dance').fadeOut().addClass("dancing"); that's all after performing fadeout now the objects will follow what is written in dancing css class and this will fire only when fadeout is completed not along with fadeOut that a real power with jQuery Chaining
- There are various so called commands in jquery such as html and others which will directly allow you to play with the selected DOM elements
- $('#someElement').html("This text is added afterwards");
- This was one example of selecting but jQuery is much more advanced in selecting then any of my articles or sessions can convey to you its real power can be leveraged only by you all creative minds out there, i can just introduce it to you but afterall its your creativity of playing with the DOM which will lead to ultimate cool things to inspire others.
- Some examples i have prepared for you of much advanced selectors remembers these selectors though seeming advanced to you are nothing for jQuery it can handle much more advanced selectors.
- $("p:even");
This selector selects all even <p> elements.$("tr:nth-child(1)");
This selector selects the first row of each table.
$("body > div");
This selector selects direct <div> children of <body>.
$("a[href$=pdf]");
This selector selects links to PDF files.
$("body > div:has(a)" this selector selects direct div of the body tag which have a elements that the links.
- $("p:even");
- Also you can check one of my other post on using regular expression syntax with jquery to select group of elements having common word in their id's.https://www.smallworkarounds.com/index.php/2009/01/04/jquery-and-regular-expressionstrick-1/
- I will be doing more basic,intermediate and advanced level tutorials on Jquery, Microsoft Ajax Library and combination of both in order to get maximum output and using Client Side Ajax Control Templates and Data View Controls to maximize for scalability.
Stay tuned for more on Jquery!!!!!!!!!!!
Happy Programming !!!!!!!!
Asp.net & IIS Tricks:- Using GZip Compression with IIS 6.0 to compress your dynamic content such as your aspx pages and increase the client side experience by downloading the pages fast.
Introduction
In this article i will discuss how to enable gzip compression for the dynamic content.After following these steps you can enable compression for your aspx pages and other dynamic content. But you have to be careful while compressing the dynamic content.I would suggest you to use the dynamic compression only when although you are using asp.net but most of your webpages are more likely to be static with only few of them changing now and then. This is due to the reason that compression brings in overhead on the server CPU and memory.So if the content is so much dynamic that it keeps on changing with every request its not at all advisable to use the compression for your dynamic pages. Instead you can use gzip compression for your static pages such as html,css and js files. But if your dynamic content is also near about static then you can use gzip compression provided as a built in feature of windows and IIS 6,by default it is not enabled here in this article we will go through the steps to enable the gzip compression scheme. Enabling this compression can also be useful for developers who are running and testing their websites projects on their dev machines and are frustrated of long loading time of the content of their test websites and web applications.
Case Study
Here the case study consists of one of my recent projects which was a public facing website build up on Telerik's Sitefinity Content Management System. So here in my case as the client was using Sitefinity so my pages were all .aspx pages but they were rather static as we CMS enabled their existing HTML content which was almost static. So i will provide you with the reduction in size without any significant load on the server which was achieved using the gzip compression scheme with IIS Lets analyze the page HTML,CSS,JS before enabling the compression.Below are the images which are self explanatory.

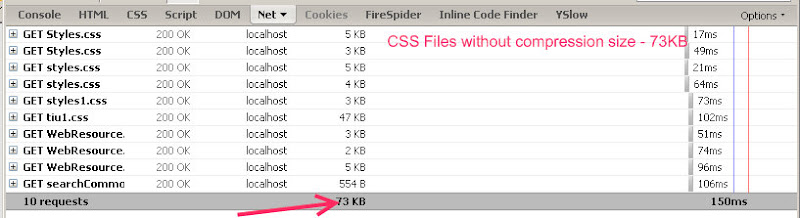
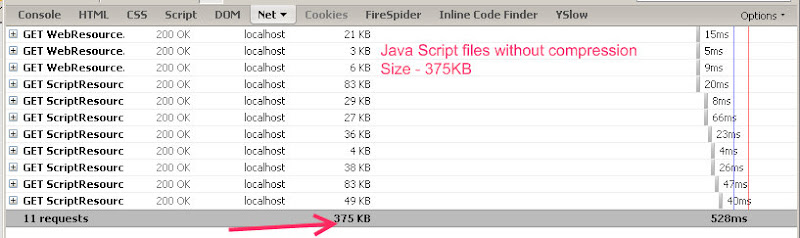

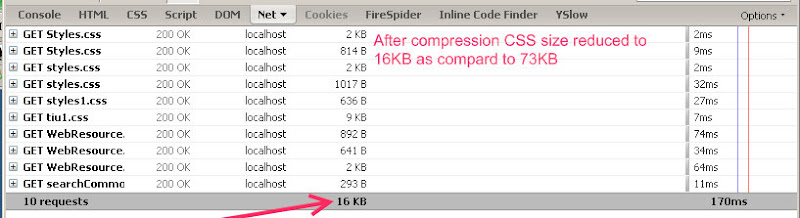
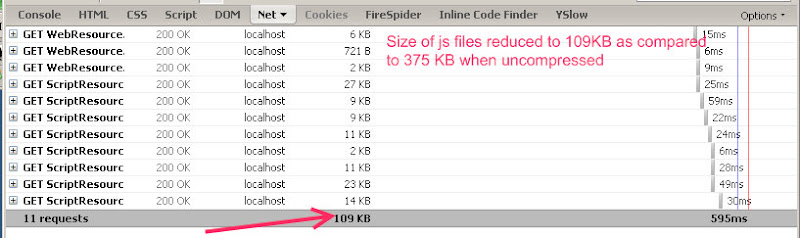
So it is now quite obvious that there is a lot of reduction in the actual page size which will be transferred across the wires. So in specific situations you should enable compression for all the content and in most of the cases at least you should enable the gzip compression for the static content. Enabling the GZip Compression Now let us walkthrough the steps to enable gzip compression within the IIS.
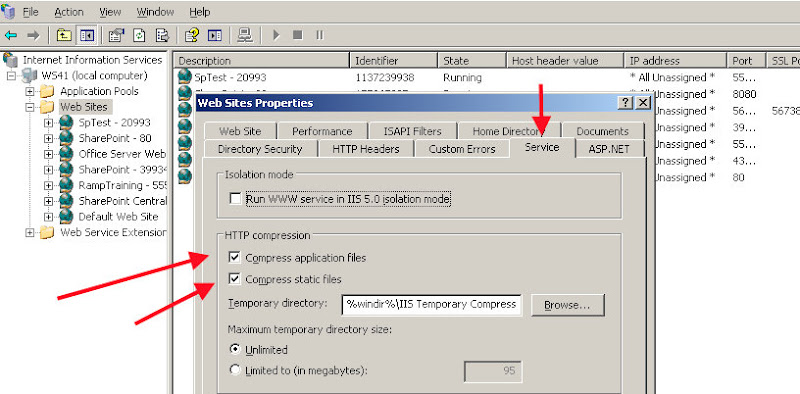
- To enable gzip compression first open the IIS Manager using "inetmgr" command at your run command prompt.
- After opening the IIS Manager navigate to the website properties by right clicking the website node.(Remeber here all images are shown from Windows Server 2003)
- Now go to the service tab and inside the http compression section enable compress application files and compress static files both and then click ok.
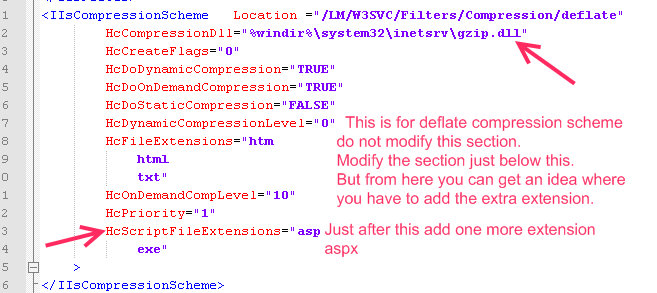
 After this just navigate to the Web Service Extension section and in this section add a new extension for gzip compression.Just Click Add new Web Service Extension and name the extension as Http Compressor or anything and in the Add section select the file gzip.dll which is inside C:WindowsSystem32Inetsrvgzip.dll and then click OK.


Conclusion User gzip compression over the default deflate compression every time for your all static pages and content leaving some special cases and scenarios. And also try for compression of your dynamic content if it is more of a static type. Getting file reduction upto 70-95% is a lot when we are talking about transferring data on net. Happy Programming!!!!.... Stay tuned for more on upcoming posts..........
Jquery And Regular Expressions,Trick #1:- Selecting all the tags matching some string or having a particular string in its id or classname
This trick will come very handy for the server controls which sometimes emit their own id's while rendering the equivalent HTML.Most of the server controls append the id of their parent server control container. So while working with asp.net it becomes a tedious task to catch all those id's which are different from their actual id's which we gave using the 'id' attribute. This is one of the ugliest thing of WebForms and also this can be treated as a disadvantage while using webforms because we donot have direct id's as given while we were writing the code, i.e what we gave is not what we recieve. And this is one of the advantage of using MVC framework as it gives more control on the rendered HTML. So here we assume a situation in where we are not using MVC, we are only using webforms and in our case there is a situation where in we have widgets which are user controls and are created dynamically as soon as they are dropped.These widgets when rendered are enclosed inside a div having an id="widget123333444asdfdf" i.e in the id there is a word widget which is fixed and is inherited and rendered by every widget but after the widget word another random guid value is appended which probably might be the id of widget. So in this case if we only have id's and no class is assigned to these widgets and if we want to give some common styling to these widgets then it becomes a problem to select all dynamically created widgets and perform some operations on them. You may argue why not use a common class for them and then style them or do whatever you want.But believe me my friends i am telling with experience that there are situations when you only will have id's or any one selector and you can't even edit the markup you have to do stuff's with only what you have. So considering that situation there is a simple one line hack using Jquery Regular expression attribute selectors. These attribute selectors can be used in different ways.I will do detailed posts on these selectors in future. But for now lets concentrate on our particular condition and get a way to select all the elements having a common word in their id's Consider the example below:-
<body>
    <form id="form1" runat="server">
    <div>
        <div id="first1">
            This is the first div
        </div>
        <div id="first2">
            This is the second div
        </div>
        <div id="first3">
            This is the third div
        </div>
        <input type="button" class="changecolor" value="ChangeColor" />
    </div>
    </form>
</body>
Here we try to mimic the situation discussed above by creating 3 div's having "first" as common in their id's followed by their repective numbers.
Now we will use the jquery attribute selector with simple regular expression to selecte each of these 3 div's and on click of the changecolor button the background color of each div should be changed this is what we have done below.
<style>
        .changecolor
        {
            border: none;
            background-color: #999999;
            color: #fff;
            margin-top: 10px;
            cursor: pointer;
        }
    </style>

    <script src="http://www.google.com/jsapi"></script>

    <script type="text/javascript">
        google.load("jquery", "1.2.6");
        google.setOnLoadCallback(function() {
            $('#first1').css({ 'background-color': '#C3E5A7' });
            $('#first2').css({ 'background-color': '#A7C4E5' });
            $('#first3').css({ 'background-color': '#DAA7E5' });
            $('.changecolor').click(function() {
                $('div[id*=first]').css({ 'background-color': '#E5C6A7' });
            });
        });
    </script>
So here the last line is important in which we use $('div[id*=first]')..... This selector will select all the div's having "first" in their id's at any place.
So this gives us a very simple solution for a so called complex problem.
We can use regex selectors with attributes in many different ways which i will show with examples in future posts so stay tuned....
Happy Programming!!!....
You can view live demo of this example here:-

Visual Studio Tips & Tricks #2:-Decrease your loading delay by stopping the splash screen to load on Visual Studio Startup
Sometimes you may find that your Visual Studio IDE is taking a lot of time to startup and this is annoying. So there can be many reasons why your IDE is behaving so strange and slow. So one of the visual enhancement trick is to disable the splash screen which comes when visual studio starts up. To disable this splash screen just go to your Desktop icon which says "Microsoft Visual Studio 2005/2008" and right click on it. No click on the Properties and in the target to this shortcut just add /nosplash. Now your target looks as "C:Program FilesMicrosoft Visual Studio 9.0Common7IDEdevenv.exe" /nosplash. And now if you open your IDE with this shortcut then you will not find any splash screen while loading. Remember this removes the splash screen option only from your shortcut, so if you use devenv Run shortcut then you will see the normal splash screen. Stay tuned for more tips and tricks... Happy Programming!!!!!