Integrating Paypal with Blogger or any other Blog Provider
If you want to earn from your blog you have many options such as Adsense,Adbrite,LakeQuincy Media and there are several other advertising giants which will help you make more money. But another good way to make money from your blog is by providing a way through which users who want to donate you some bucks can directly donate it to you and the best possible solution which comes to my mind is PayPal. Here in this article i will show you how easy it is to integrate the paypal into your blog.I have done it on blogger,you can follow similar steps and embed it in any blogging platform
- Login to your paypal account.And click on the Merchant Services tab.

- After clicking the Merchant Services tab search for the word Donations and click it then you will see the below screen.
- Fill the form and selecting your choice and preferred buttons and then click Create Button

- After clicking on create button you will be provided with a code.Now you have to just place that code into your blog’s code to make it running.

- I will show you how to integrate it into blogger
- Login to your blogger account and go to Layout tab.Click on add a gadget

- After adding a popup window will be opened.Just enter the heading which you want to be displayed and also write few lines of your own choice which you want to display.After writing all this just paste the code which you got above i.e after creation of your button.

- Click Save and that’s it your paypal donation button is now integrated with your blogger blog.
StatCounter:- A valuable and simple tool to analyze,share your traffic stats with others,and ultimately increase your traffic
Most of us use Google Analytics which is free to analyze our traffic and this is a good practice, but self analysis of your website should be augmented by sharing your traffic stats to the whole world.
This cannot be done through analytics as such, there are many other services which can do this but in my personal preference i use stat counter to achieve this for me. StatCounter is a paid service but there is also a fully functional free version which is out there to try and believe me the free version is also as powerful as the paid version for a normal user. StatCounter gives you a quick way to analyze your traffic data,although analytics gives much better presentation of the data but still for the simplicity sake i prefer stat counter. One more benefit for which i use stat counter is its summary area which you can share with other people. Although you can face one problem while using statcounter that how to enable showing stats to guest user to your blog or your website.  By default if you provide the link given by stat counter it will ask you the login credentials but if you just append &guest=1 after the link as shown in figure" then whenever the user clicks the link from his website he will be redirected to the summary page of your project in the stat counter. I personally use both stat counter and google analytics to keep track of traffic on my websites.
Blogger Tips And Tricks:- Opening each link from your new Blogger blog in a new window
If you want your visitors to stay for long on your blog and they should not navigate from your blog even if they are clicking any external links from your blog then this small trick is what you all need. Opening the links in a new window will allow your visitors to return to your blog once they have read the information in the external link which you provided on your blog.Sometimes readers just simply forget your blogs name while they navigate through and then just don't care to come back again. So to provide an easy hand to your visitors this trick can be of help. Workaround
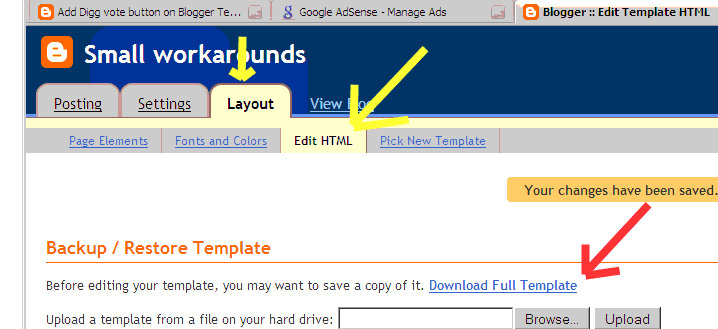
- Just sign in to your blogger and navigate to Layouts Section.
- Under layouts just click Edit HTML link.
- Remeber to backup your existing template now so that you can rollback if you don't like the changes.
4.Now just search for the </head> section in your blogger template.Remember to edit this template in firefox because it will allow you to search within the template rest all browsers which i have tested only search on the visible content on the page. 5.After you find </head>.Just above it enter this exactly the same way it is given below.
<base target=' "_blank"'/> Here in my blog the html tags will be replaced by their tags and symbols so i have provide the image below on how you should add this so kindly do it the same way.
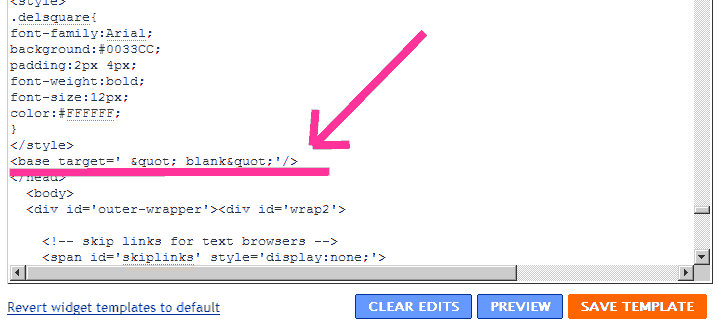
Remeber this is tested only for new blogger.I have not tested this myself for old blogger. That's all now save the template and see the changes now your every link will open up in a new window not in the same window in which your blog was opened. If you have any doubts then do leave a comment.
FeedBurner only showing 25 feeds for Blogger blogs,How to get all my posts feed in feedburner
Blogger's atom.xml file by default contains only 25 latest posts and when we burn this file with feed burner then only these 25 posts are converted to feedburner feeds, so what if i want all my feeds to be burnt by feed burner and to be availiable as feeds to my subscribers. Workaround
- So the workaround for this common problem is just go to your blogger homepage and do the View Source
- In view source you will find an entry saying .....Atom" href=http://www.blogger.com/feeds/....some no/posts/default.Lets assume this no to be 12345678 so you will be having it like this.....Atom" href="http://www.blogger.com/feeds/12345678/posts/default.Its also shown in the figure below.
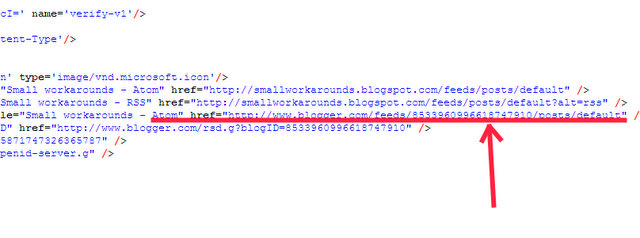
3.Just copy that URL and add to its end ?max-results=100 so now your final URL will look like http://www.blogger.com/feeds/12345678/posts/default?max-results=100. 4.You can also replace this max-results =100 by 500 or 50 or by any no which blogger provides. 5.Also there is some limit on feedburner feeds size. its something around 500-550 KB's so keep that also in mind before giving a very large no. 6.That's all go to your feedburner account and add this url and then burn it now you will see that the no of feeds availiable are the one which you specified as the parameter.
Want to transfer your post:- From Blogger to Blogger,Blogger to Wordpress,LiveJournal to Blogger,Blogger To Windows Live Spaces all in all almost every blog.
If you want to transfer your posts from one blogging platform to another and are facing problems , then Paul Cooley has a very good application which he calls "Blog2Blog" which can do this for you very easily. I have myself tested it for my blogger to blogger transfer and it works just fine. Also in blogger i was unable to find a safe way to transfer all the posts or selected posts to another blogger account. But with this tool you can achieve the same easily. You can download the tool from here:- http://www.paulcooley.com/linuxlore_blogstorage/apps/blog2blog/blog2blog-2.4.0.2.zip Instructions for using the tool
- Just Click the setup.exe and install the application.
- Once installed it will open up an interface like this
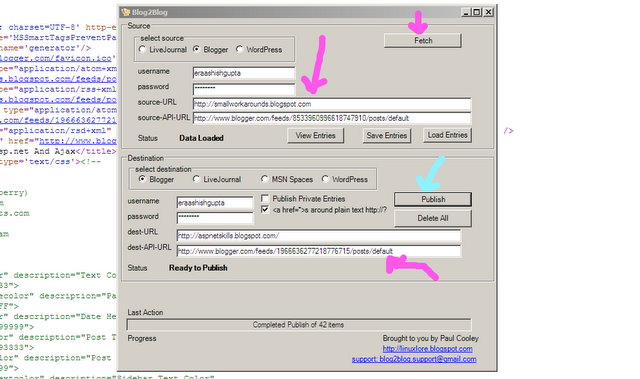
- In select source select the blogging platform from which you want to import the posts.
- Enter your username and password source-URL ex. http://smallworkarounds.blogspot.com.
- Then for the source-API-URL especially in blogger if you are using old blogger then the defaults which will be coming will work.
- But if you are on new blogger then you have to open your blog on the home page and do the view source.
- In view source you can locate and entry which says "service.post" and there will be a link after that as shown below.
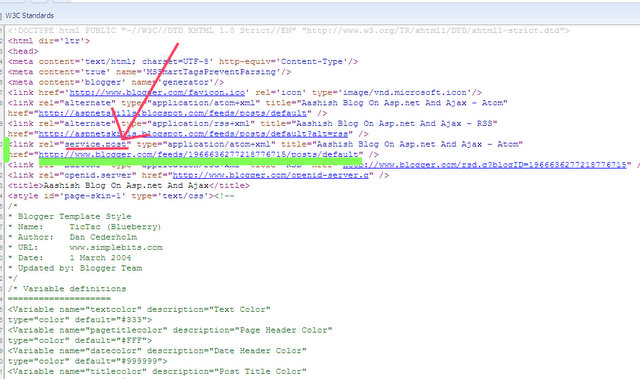
- Just copy and paste that link to the source-API-URL and this is it your source is set up.
- Remember that this trick is for new blogger only.
- Once completed with all the above things just press fetch.
- After fetching is completed just repeat the same steps for your destination blog also.
- Once you are done with your destination blog then just click publish.
- And thats all you will see all the posts being published to your new blog.
Thanks! for this great tool by "Paul Cooley" http://linuxlore.blogspot.com/2007/09/livejournal-to-blogger-or-blogger-to.html
Adding LinkedIn Button To Blogger or Wordpress or any other Blog
Today i was trying to add a "LinkedIn" to my linked in profile button on Blogger.But it was not so easy. You can directly embed the HTML and get the linked in image link if you want but for me it didn't workde.Then i came to know that the linked in people themselves provide custom buttons that you can add anywhere either to your blog or your websites. But these custom button service is rather hidden ie not visible at the first sight.So i thought that it would be helpful if i share this post with you all. Below i have given detailed description with images on how to add this linked in button to your blog. Steps:-
- Just go to http://www.linkedin.com/
2.Sign into your profile
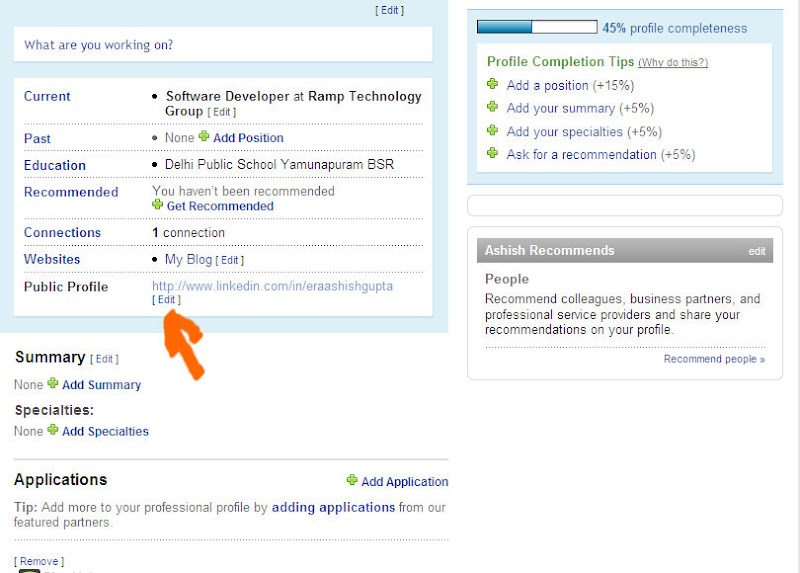
- 3.Goto public profile and click the edit button next to your public profile
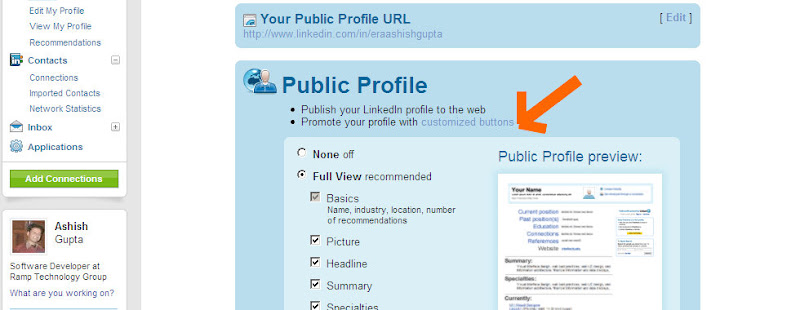
- 4.Click on promote your profile add custom buttons link
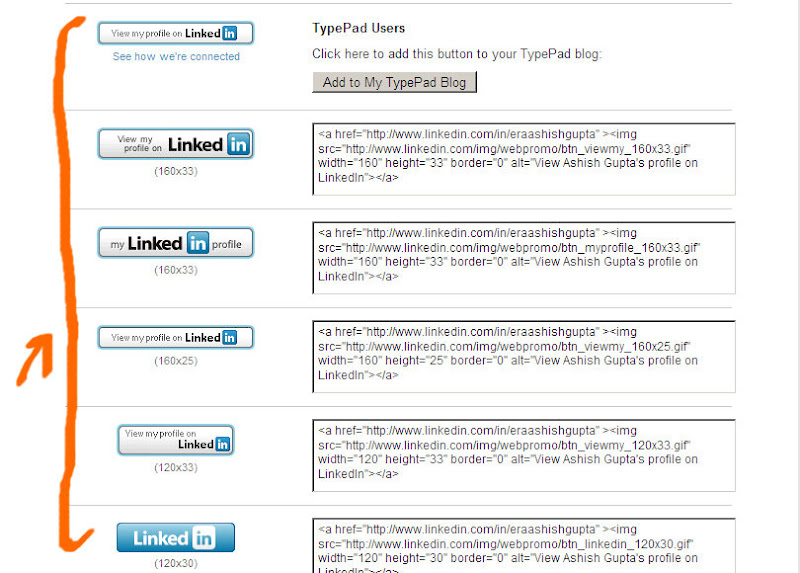
- 5. Now you can see a lot of buttons and their respective code which you can directly paste into your blog.
Configuring Windows Live Writer for Community Server Blogs
RJ Dudley has done a very good post on how to Configure Windows Live Writer for Community Server Blogs. If you want to blog on community server then this post might be of great help http://www.rjdudley.com/blog/Configuring+Windows+Live+Writer+For+Live+Community+Server.aspx
Live Activity Feed,Tag Cloud For your Blog on Blogger
If you always wanted to have a live activity feed for your blog on blogger then you must check out cool widgets from WowZio http://www.wowzio.com/ Just Say Create my widget now. On the creation page enter your feed url or simply your blog url.It will automatically get posts from your Blog and then just click create my widgets. It will create many widgets for you but my favourite are Live Activity Feed and Tag Cloud.  I am using same widgets in my Blogger blog also. The integration is very easy there is a link called add to blogger whenever you choose a widget.
Windows Live Writer Portable
Here is a very good post where you may know about Windows Live Writer Portable.For those who don't know Windows Live Writer is a desktop based application from which you can manage you n number of blogs.It consits of a rich sets of plugins to achieve different blogging objectives. Its a musch check and must have tool for bloggers The link to the post which i mentioned earlier is http://www.techlifeweb.com/2007/09/08/windows-live-writer-portable-20-now-with-u3/ You can download the portable version of Windows Live Writer from the below given link and you have to follow the instructions given above to install this portable version. http://www.techlifeweb.com/download/WLWPortable2.zip
Windows Live Writer Important Shortcuts
Few important shortcuts which can make you more productive using Windows Live Writer
- Ctrl + F11 for normal view, no styling information is applied while you are writing your blog entry
- Shift + F11 this is the Html Mode, here you can edit the Html contents of your posts and just do any manipulations in the HTML or do any inline styling to you post
- F11 If you want to writer your blog with all the styling information about the blog in your background while writing.
- F12 To see the web preview of the post once you write it, this shows how your post will look after publishing.
- Ctrl + L to insert an image either from web or from your desktop
- Ctrl + K Insert Hyperlinks
- Ctrl + Shift + V is the shortcut to Paste Special Command what it does is if you copy the content from somewhere else it can remove the styling information from the original content and yet preserving all the image and link tags,its thus really powerful
- F7 is to check spelling on the post.
If you want some more information regarding windows live writer than you can obtain it from these posts http://smallworkarounds.blogspot.com/2008/10/windows-live-writer-portable_24.html https://www.smallworkarounds.com/index.php/2008/08/10/download-windows-update-agent-5802469/ https://www.smallworkarounds.com/index.php/2008/08/10/downloading-windows-writer-2008-and/