Resharper:- Visual Studio Refactor,Maximize your productivity-(Code Generation Techniques And Code Analysis Techniques)-Part1
Resharper is one of the most widely used utility for the .net Developers who use Visual Studio,it can be either VS2005 or VS2008.Every person who wants to be more efficient,productive and do smart coding should always use refactoring. Although VS2008 has bunch of refactoring features inbuilt but they are not sufficient if you do a lot of work in Visual Studio.For this kind of situations Resharper is a must have add-on and its price is worth its value. In this series of my articles i will try to explain you with many of its features related to refactoring and some of its other powerful stuffs. Although there can be a learning curve in mugging up some keys but once you practice them in your daily coding and make it a habit, you will find that your productivity has increased a lot.
First Let's See some of the Code Generation Techniques using Resharper
- Creating File from Template
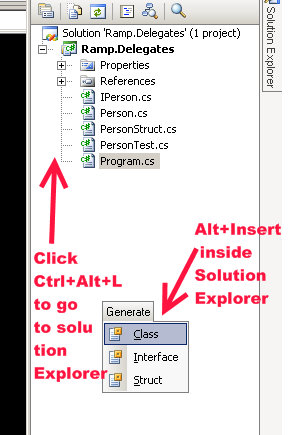
- You can just press Ctrl+Alt+L to open the solution Explorer
From inside the solution Explorer just press Alt+Insert to open the generate file from Template smart navigation as shown below
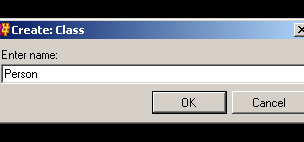
- 3. This will create a new Class called Person and put it inside the required Namespace.
-
Surround With Template
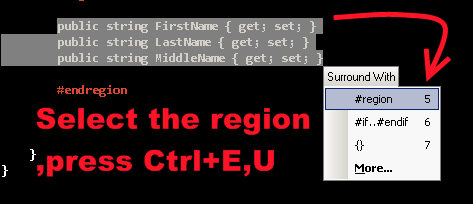
- Just Select the region you want to Surround with a region and then press Ctrl+E,U
-
- 4.You can create a new class,Interface,Structure in the similar fashion.
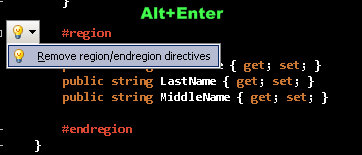
To remove the region surrounding again to its original just press Alt+Enter on the region bubble and Press Remove Region
-
Insert Live Template
-
To insert live template just press Ctrl+E,L
-
Live template can be used to insert various code templates some of which are frequently used such as enum,interface,#region,prop etc...
-

-
-
Insert some common code using Alt+Insert inside a file
-
Just Press Alt+Insert inside a file to get a number of code generation templates including creating Constructors,Properties,readonly properties,implementing missing members,overriding members,delegating members,equality members,formatting members.
-

-
Code Assistance And Analysis using Resharper
-
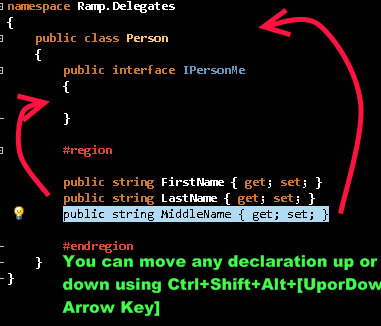
Moving the Code Block Up and Down
-
Just Press Ctrl+Shift+Alt+[Up] to move up or Ctrl+Shift+Alt+[Down] to move down.
-
- Show available quick fixes and context actions
- Most of the times you will make use of this shortcut,whenever you see a bulb in front of your code line you can just press Alt+Enter to see related quick fixes and context actions.
- Symbol Code Completion
- Shortcut for symbol code completion is Ctrl+Space
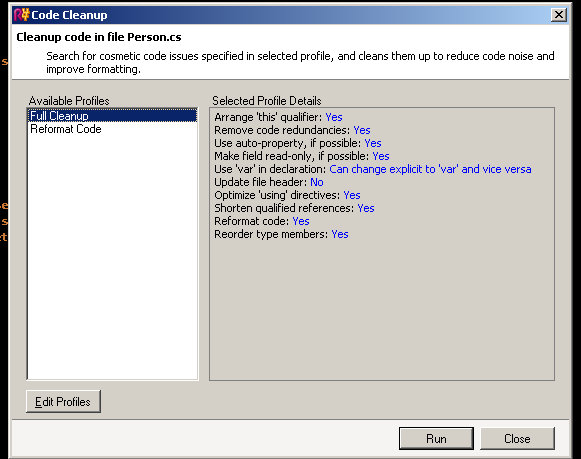
- Code Cleanup
- Resharper includes a code cleanup module which can clean up your code according to some predefined set of rules
- Just press Ctrl+E,C prompt code cleanup and press Ctrl+E,F for silent cleanup
- Extending And Shrinking the Selection
- For extending the selection just press Ctrl+Alt+RightArrow
- Fore shrinking the selection just press Ctrl+Alt+LeftArrow
- Comment with Line Comment
- Just Press Ctrl+Alt+/ to comment with line comment.
- Comment with Block Comment
- Just Press Ctrl+Shift+/ to comment with block comment.
- Duplicate or Copy and paste a line ore selection
- Just press Ctrl+D to duplicate the selection or the line and this duplicated copy is inserted just after the line which is duplicated.
If you are new to Resharper you can download it from the below given link http://www.jetbrains.com/resharper/download/ Rest of the techniques will be covered in next article in this series which will be related to search assistance and navigation techniques using Resharper. So stay tuned for more ......... Happy Programming!!!!
SytleCop For Resharper 4.1 Updated and a new Release is out...Wow!!!
StyleCop for Resharper is a Resharper4.1 plugin which allows Microsoft Style Cop to be run as we type and generates real time syntax highlighting of violations
- If you don't know what Resharper is visit this page
- If you don't know what Microsoft Style Cop is visit this link
- To download StyleCop For Resharper visit this link
Guys do check out this it will help you write cleaner code which is in accordance with specified standards. According to me Resharper and Style Cop are must have's for a .net developer to code smartly and efficiently. More on this in upcoming posts...... Happy Programming!!!!!
Visual Studio 2008 Tips & Tricks for Developers:- This includes some shortcuts and some hidden features in Visual Studio 2008 which will increase your productivity
- Working in Full Screen Mode in Visual Studio
- Alt+Shift+Enter is the shortcut to enter to fullscreen mode in Visual Studio
- Its sometimes really helpful and more appealing for developers to work in full screen mode
- Editing
- For Copying a line in the IDE just go to the start of the line and press Ctrl+C,there is no need to select anything
- For Pasting a line just go to the start of the line and just press Ctrl+V
- For Deleting a line just go to the start of the line and press Ctrl+X, this is not actually delete but its similar to cut if you do Ctrl+X on current line and go to some other place in your code and do Ctrl+V then it will paste the same line there.
-

- Expanding and Collapsing the code units
- This nice little shortcuts has saved me a lot of time.Whenever i am working on a large piece of code i always get confused and make some changes in other Method or property because they were looking similar.
- But now with this shortcut i collapse one method as soon as it is finished.
- The shortcut is Ctrl+M+M.
- Just go to the beginning or end of the method or property or any code block and hit the shortcut it will expand or collapse the code block comparing to its present state.
- If you want to collapse all your code units or blocks to their definitions then the shortcut to achieve this is Ctrk+M+O or Ctrl+M Ctrl+O.This is also a very handy shortcut which helps a lot in development.
- Automatic Text Indentation and Formatting
- This shortcut helps me to write beautiful and decorative code which is easy to understand by any person.
- Shortcut is just press Ctrl+K+D.
- This works not only in C# and VB code behind but it works well in aspx pages.
- If you want to just format the selected piece of code then just press Ctrl+K+F
- Automatically adding Namespaces
- Use the Ctrl+. (Remember this is Ctrl+[period] if you get confused) shortcut key to automatically get intellisense for probable namespaces.
- Just press enter to include the required namespace.
- There are much cooler tricks when using a refactor like Resharper.I will discuss those tricks later this month in one of my posts.
- Commenting And Uncommenting The Code
- This trick saved me a lot of time.
- Just select the code to be commented and press Ctrl+K+C,this will comment your code block.
- For uncommenting the code just press Ctrl+K+U,this will uncomment the code block.
- Automatically generating properties
- Generating dummy getter and setters or properties is also a pain in big projects.
- Although i would recommend you some refactors like Resharper which can do it for you or some code generators like Code Smith and also give a try to inbuilt on in Visual Studio 2008 called T4 or Text Template Transformation Toolkit.
- But if you don't have such a mass volume project and just don't want to write your getter and setters then just type this prop + TAB+TAB
- Remember you don't have to type all of this but you only type prop and then press TAB two times for VS2008 to automatically generate the property for you now you can change the name and any other thing by navigating and just pressing TABS.
- Increasing and decreasing the indentation
- Select the code block for which you want to increase the indentation and after selecting just press TAB,this will increase the indentation.
- To decrease the indentation just select the required code block and then press SHIFT + TAB,this will decrease the indentation of the selected code block.
- Selecting a single word then line and then other lines within that block and then.......
- This is also a cool trick if you are in middle of something and want to do something on either the word you are on or the entire code block, or entire method, or entire class then just go on pressing Ctrl+W,it will start selecting for you starting from the current word.
- After selecting the desired code block you can perform any operation on that code block.
- Build & Debug Shortcuts and tricks
- To build a solution just press Ctrl+Shift+B
- To start debugging just press F5
- To stop debugging just press Shift+F5
- If you are already debugging or your WebDev.WebServer.Exe is running or any other webserver is running you can directly attach to that process escaping the hussle to build again this is a great time saver.Remember always build or rebuild if you have done some major changes but if simply you want to debug and have done no changes in any other class library projects then you can use this trick
- Simply Press Alt+D+P then the Attach to process window will open.
- Simply choose your web server process to attach and you will see without building your entire solution your solution has been attached to the debugger.

- Find Options
- You are already familiar with Ctrl+F option to find something either in current documents or all open documents or entire project or entire solution,but another find option is Ctrl+Shift+F, this trick is helpful when you want all your results to be listed in a find window rather then to navigate one by one in every file where the searched string exists.
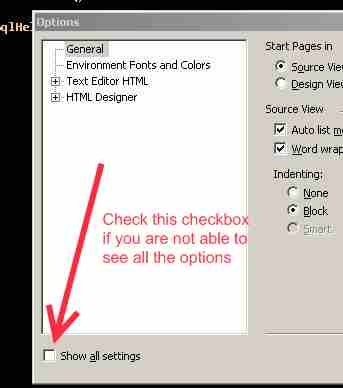
- Switching Between Design And Source Views
- F7 is the key used to switch between design and source (ie c# or vb files) views in IDE
- If you want to just toggle the markup's design and source view or want to view both then press Ctrl+PageDown
- Some other common used shortcut keys which can be helpful
- Ctrl+Alt+L for opening Solution Explorer
- F4 for opening properties window
- Ctrl+Alt+X for showing the toolbox
- Ctrl++T for displaying the tasklist
- Ctrl++E for displaying the error list
- How to navigate between various opened tabs inside Visual Studio
- Ctrl+TAB key will let you navigate between various open tabs in Visual Studio IDE
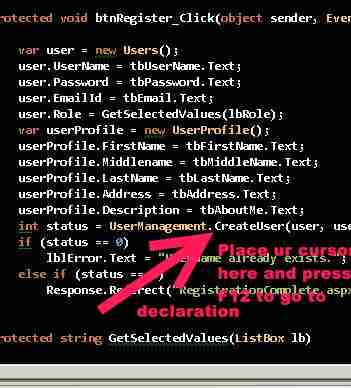
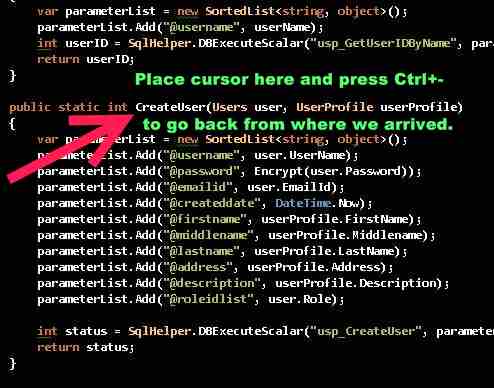
- Going to Declaration and then again returning to the actual usage
- Just press F12 to go to declaration
- And press Ctrl+- to return back to the piece of code where you were earlier.
- Selecting Source Control Plugin
- If you are working in a team you probably will be using a source control there are many options to choose SVN,Visual SVN,TeamFoundationServer,Source Vault and Source Fortress and many others.
- But when selecting a client you have to mention it in Source Cotrol Plugin Selection as shown below

- I want solution for every project which i create
- If you want a solution for every project which you create then you have to enable this as shown below

I would have really forgotten many things which could be added in this list.I will update this list regularly as I encounter any new thing,so stay tuned for more Also I would be doing an extensive post on Resharper 4.0,the most sharpest refactoring tool available out there its not just a refactor but a way beyond that Believe me i use it in my day to day coding and it makes development process 100K faster. Happy Programming!!!! Update 12Dec2008
- For deleting a line in Visual Studio just place the cursor in front of it and press Ctrl+Shift+L
Update 4 Jan 2009
1.This post links to a tip used to decrease the load time of the IDE by disabling the splash screen. https://www.smallworkarounds.com/index.php/2009/01/04/visual-studio-tips-tricks-2-decrease/ “If someone wants to purchase Visual Studio 2008 at a discounted price, you can purchase at a low price from eCostSoftware.”
Tabbed Browsing in IE6 :- How to get tabs in Internet Explorer 6
Tabbed Browsing is a concept which is now common in every new browser whether it is IE7 or IE8 or Firefox old and latest versions,Chrome,Safari,Opera and generally every new browser have this facility to be called new enough and to get added to the list and make a difference. But many people still use old days Internet Explorer 6 and we as developers have to make our websites work as well under IE6 as they are in other new generation browsers. But without tabbed navigation it is very difficult for any type of user who uses IE6 either he is a developer or he is using IE6 for simple browsing purpose. So the workaround to get tabs for IE6 is really very simple Workaround
- Just follow the below given link and download the Windows Live Toolbar
- http://toolbar.live.com/moresysreq.aspx for Microsoft Windows Vista™ RC1, Windows XP SP2, Windows Server 2003, or Windows 2000 SP4
- If you have already yahoo or msn toolbar installed and you dont require them please do remove them because especially yahoo toolbar will have some issues with the windows live toolbar.
- Now install this windows live toolbar.
- Now if you see tabbed browsing option button then its well and good.
- Else if you have a window like this with toolbar installed and no add tabs button.

- 6.Then probably the tabbed browsing button would not have been installed or it would have been turned off.
- 7.So if its not installed you can download it from this link
http://gallery.live.com/liveItemDetail.aspx?li=6ad971ea-c0dc-4880-be38-80f0859eb291&bt=2&pl=3
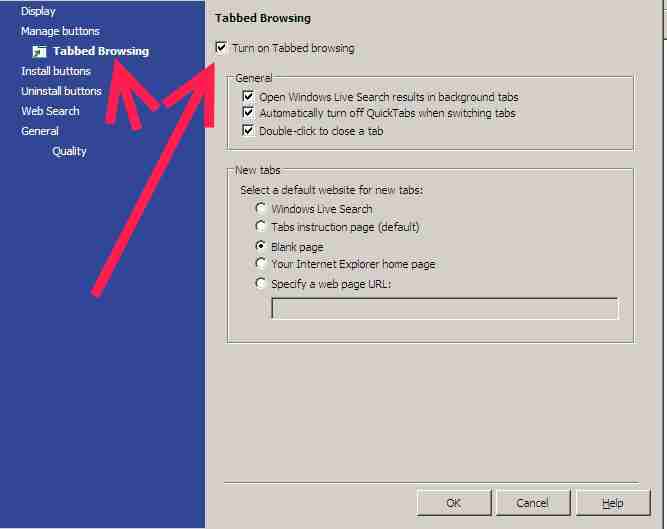
- 8.Just run the downloaded .msi file,Now your toolbar should contain the tabbed browsing buttons like this

- 9.After doing this also if you are not getting the button then please make sure that tabbed browsing is turned on.To do this just click you windows live toolbar icon at the leftmost part of the toolbar and select toolbar option from the menu and just turn on the tabbed browsing from there.
- This will do the trick for you!!!!!.
How to display firefox status bar in fullscreen mode
By default firefox will not show you the status bar when its running in the full screen mode. Status bar is needed in the full screen mode especially by developers to see what's being currently requested by the page which is currently being opened. Status bar also contains various plugins such as adsense plugin,video downloader plugins and many similar plugins. So given below are sequential steps on how you can get your status bar in full screen mode in firefox. Workaround
- Just navigate to the path given in your computer
- Windows XP/2000/2003Server----> C:Documents and Settings[User]Application DataMozillaFirefoxProfilesxgggxznr.defaultchrome
- Windows 95/98/ME----->c:windowsApplication DataphoenixProfiles[profile-name][#s].sltchrome
- Windows NT---->%UserProfile%Application DataphoenixProfiles[profile-name][#s].sltchrome
- *nix-------------->~/.phoenix/[profile-name]/[#s].slt/chrome/
- Mac OS X--------->~/Library/Application Support/Firefox/Profiles/[profile-name]/chrome/

- 2.By default on some operating systems you will not have userChrome.css file instead there will be a userChrome-example.css file.
- 3.Just open this userChrome-example.css file and find a section saying "@namespace url("......
mozilla.org/keymaster/gatekeeper/there.is.only.xul");
- /* set default namespace to XUL */"
- 4.Just below this section paste this one line of code ------------------>
#status-bar {visibility: visible !important;}
5.Just save a copy of this file and rename it as userChrome.css.6.Close and restart your firefox and switch to fulscreen mode now you can see your status bar in fullscreen mode as well.I have personally tested it on my Windows Server 2003 Machine.You people can test on Vista,98/ME, Linux,Mac and post your comment so that i can re so that i can update the correct path for the userChrome-example.css file in this article.
Sitefinity CMS Error:-"...App_DataSearchAll-PagesIndex not a directory" If this is the error while publishing or saving your pages then the solution is....
If this error in Sitefinity CMS is driving you crazy then there is a simple solution to this problem which is listed below. This error might be caused when there is some missing index folder. WorkAround
- So the simple workaround is to go to Administrator tab.
- Then in administrator go to Services and then to Search screen
- This will initialize the services client and all missing folders will be recreated.
Given below are the steps in images which will solve this problem
